Written by David Im, Co-founder of Dooi
Introduction
As AI becomes a core part of everyday workflows, ChatGPT has become second nature for billions of people. But until now, ChatGPT was mostly about conversation, not interaction.
What if you could chat with apps directly inside ChatGPT, from booking hotels to designing slides, all in one place?
That's exactly what ChatGPT Apps bring to the table. Powered by the new Apps SDK, developers can now build interactive, context-aware apps that live inside ChatGPT.
In this guide, you'll learn how to build your own ChatGPT app. We'll walk through each part of the code and I'll explain how it works.
By the end, you'll have a running ChatGPT app that can dynamically show widgets directly in your ChatGPT environment.
Step 0. How does apps in ChatGPT work?
A ChatGPT app is basically a mcp server that serves widgets.
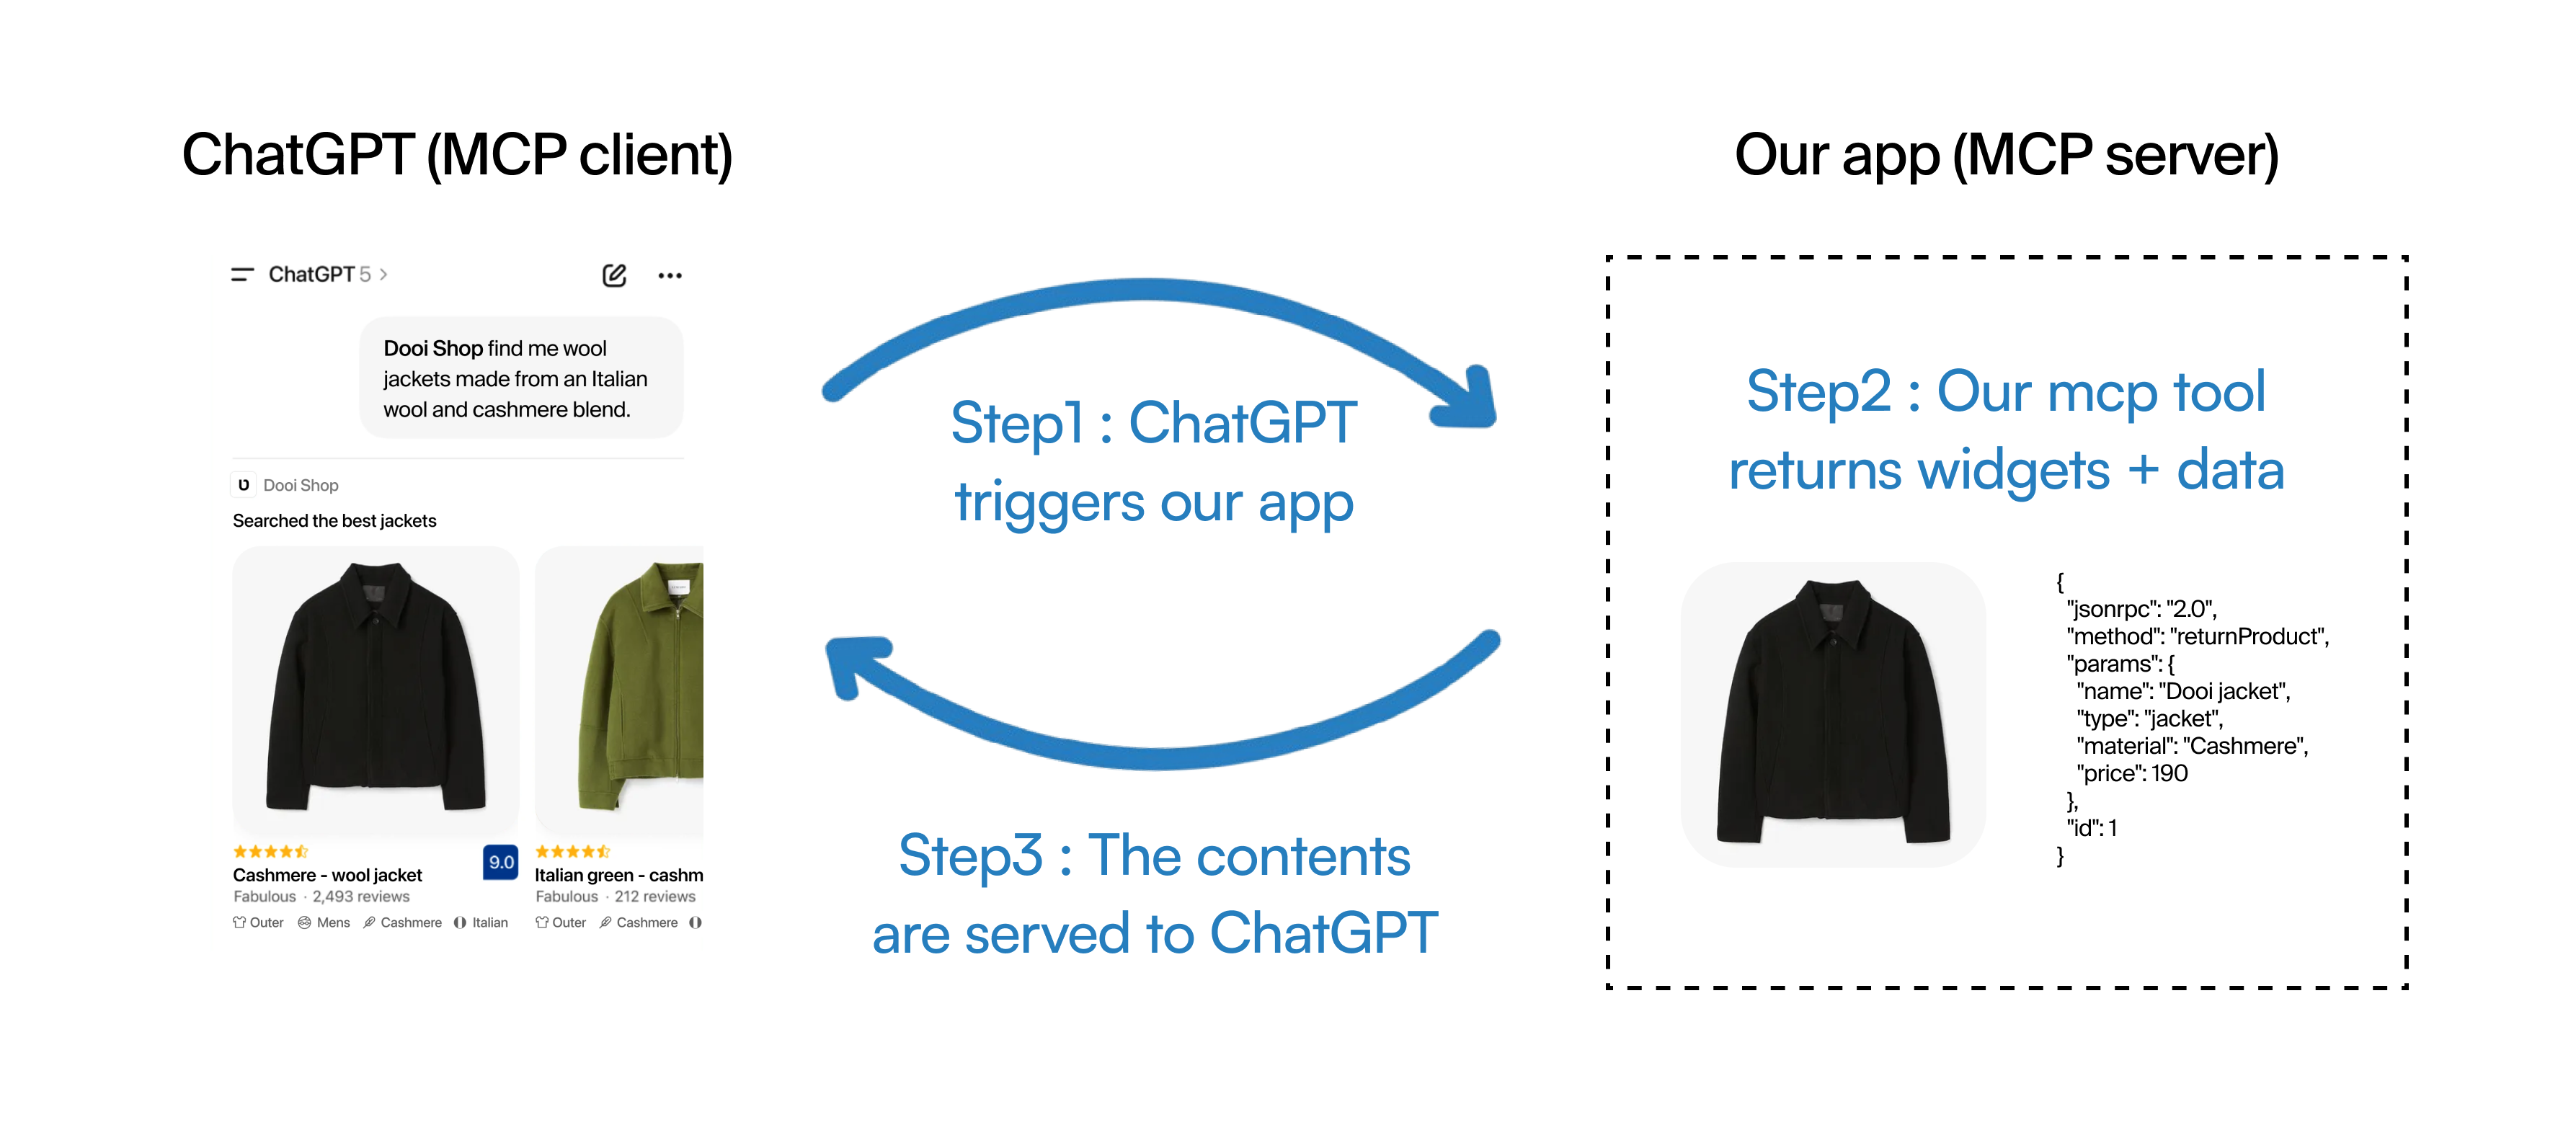
As you can see from the picture above, it all starts by ChatGPT triggering our app based on the user’s message. The user’s message is sent to our app.
Our app then chooses a mcp tool that best matches the user’s message. For example when the user asks “I want to buy clothes”, our app will choose a mcp tool like “ShowClothes”.
Then, the tool returns widgets and data. A widget is the component that’s shown at ChatGPT, and the data is the response that ChatGPT could use.
Step 1. Install FastApps
Now as you know how ChatGPT apps work, we will dive into building it. We will be using FastApps, which is the open-source framework for building ChatGPT apps.
First, install FastApps with uv:
uv tool install fastappsuv tool install --upgrade fastapps # Update to the latest versionStep 2. Initialize a New App
Once installed, you can quickly start by running:
fastapps init my-appcd my-appfastapps dev
That’s it. You’ll see an image with a public URL automatically generated via Cloudflare Tunnel.
Your MCP server will be available at the /mcp endpoint.
Example:
https://your-public-url.trycloudflare.com/mcpStep 3. Test Your App
Option A: Test with MCPJam Inspector
Use the MCPJam Inspector to connect and test your server:
npx @mcpjam/inspector@latestThen, enter your public URL + /mcp.
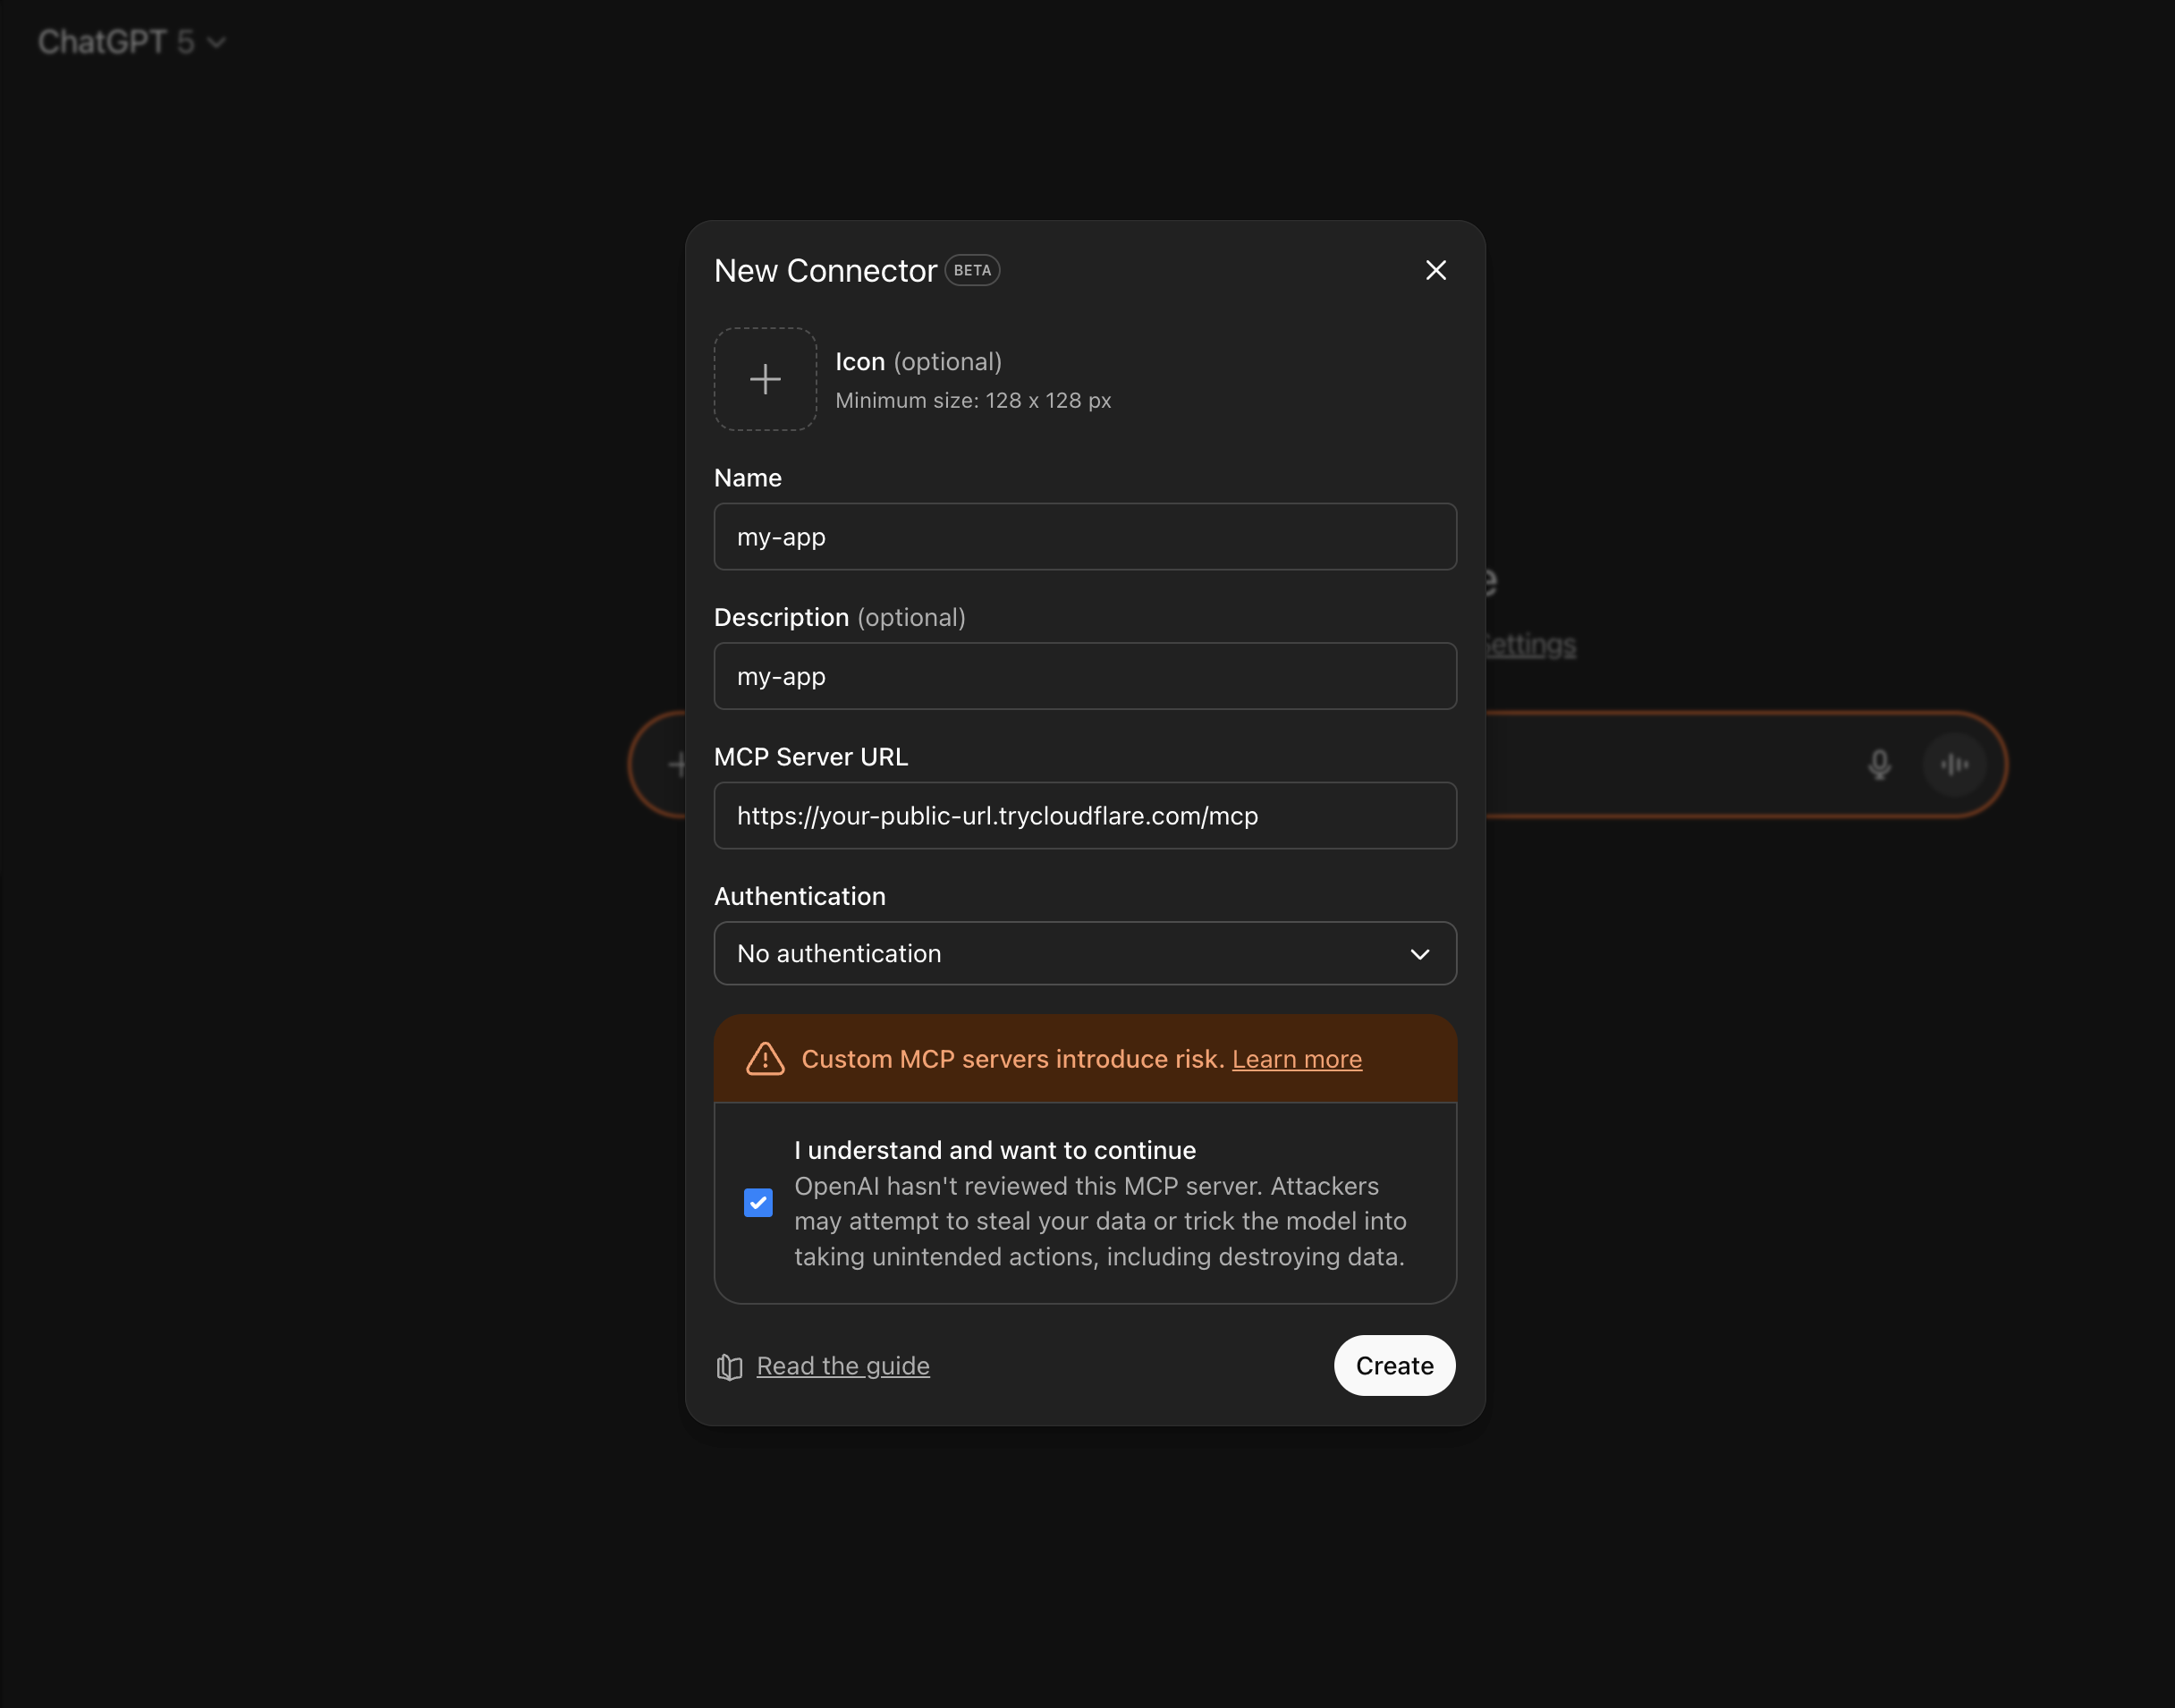
Option B: Test in ChatGPT
- In ChatGPT, go to Settings → Connectors
- Add your public URL + /mcp
- Select No authentication
Step 4. Create More Widgets
You can add new widgets anytime:
fastapps create additional-widgetStep 5. Edit Your Widget
You only need to modify two folders:
1️⃣ server/tools/ — MCP tool
Define your app logic and interaction schema.
Example:
# server/tools/my_widget_tool.pyfrom fastapps import BaseWidget, Field, ConfigDictfrom pydantic import BaseModelfrom typing import Dict, Anyclass MyWidgetInput(BaseModel): model_config = ConfigDict(populate_by_name=True) name: str = Field(default="World")class MyWidgetTool(BaseWidget): identifier = "my-widget" title = "My Widget" input_schema = MyWidgetInput invoking = "Processing..." invoked = "Done!" widget_csp = { "connect_domains": [], "resource_domains": [] } async def execute(self, input_data: MyWidgetInput) -> Dict[str, Any]: return { "name": input_data.name, "message": f"Hello, {input_data.name}!" }Each MCP tools contain various attributes that identifies the property of the tool. Looking at the graph below, you could figure out what each attributes mean.
For a more detailed explanation, you could check out the Fastapps docs
Required Class Attributes
| Attribute | Type | Description | Example |
|---|---|---|---|
identifier | str | Unique widget identifier. Must match the widget folder name in widgets/. Used as the resource URI identifier | "greeting" for widgets/greeting/ |
title | str | Human-readable tool name displayed in ChatGPT interface. Shown when the model considers calling this tool | "Show Greeting Widget" |
input_schema | Type[BaseModel] | Pydantic model defining the tool’s input parameters. ChatGPT uses this JSON schema to understand when and how to call your tool | GreetingInput |
invoking | str | Short, localized status message shown to users while the tool is being executed. Maps to openai/toolInvocation/invoking | "Preparing your greeting…" |
invoked | str | Short, localized status message shown to users after the tool completes. Maps to openai/toolInvocation/invoked | "Greeting ready!" |
Optional Class Attributes
| Attribute | Type | Description | Example |
|---|---|---|---|
description | str | Optional tool description. Helps the model understand when to use this tool | "Display a personalized greeting widget" |
widget_accessible | bool | Whether the widget can initiate tool calls from its React component | True for interactive widgets |
2️⃣ widgets/ — Frontend UI (React)
This folder contains UI components shown in ChatGPT.
Example:
// widgets/my-widget/index.jsximport React from 'react';import { useWidgetProps } from 'fastapps';export default function MyWidget() { const props = useWidgetProps(); return ( <div style={{ padding: '40px', textAlign: 'center', background: '#4A90E2', color: 'white', borderRadius: '12px' }}> <h1>{props.message}</h1> <p>Welcome, {props.name}!</p> </div> );}Widgets are React components with additional hooks that interact with ChatGPT.
For a more detailed explanation, you could check out the FastApps docs.
Step 6. Deploy your ChatGPT app for public use
You can directly deploy your ChatGPT app from your CLI:
fastapps cloud deployFollow step-by-step instructions from the CLI.
Conclusion
In this tutorial, you learned how to create a ChatGPT app using the FastApps framework. You've built an MCP server, which is the core of the ChatGPT app, created additional widgets and tools, and deployed it directly from the CLI to make it public.
This structure is simple yet powerful. With just a few lines of code, you can build a fully functional ChatGPT app that's available for everyone to use.